Welcome to PewPew Documentation
PewPew is a family of handheld devices that make learning to write simple games with Python easy, and also let you tinker with electronics.
They all have a small 8×8 display and six buttons, and they all use the same “pew” library for accessing them. However, they differ in size, price and features available.
PewPew Library Reference
- pew.init()
Initialize the module.
This function switches the display on and performs some basic setup.
- pew.brightness(level)
Set the brightness of the display, from 0 (minimum) to 15 (maximum). On devices that don’t support varying the brightness this does nothing.
- pew.show(pix)
Show the provided image on the display, starting at the top left corner. You will want to call this once for every frame.
- pew.keys()
Return a number telling which keys (or buttons) have been pressed since the last check. The number can then be filtered with the
&operator and theK_X,K_DOWN,K_LEFT,K_RIGHT,K_UP, andK_Oconstants to see whether any of the keys was pressed.
- pew.tick(delay)
Wait until
delayseconds have passed since the last call to this function. You can call it every frame to ensure a constant frame rate.
- class pew.Pix(width=8, height=8, buffer=None)
Pix represents a drawing surface,
widthpixels wide andheightpixels high.If no
bufferis specified for storing the data, a suitable one will be automatically created.- classmethod from_iter(cls, lines)
Creates a new Pix and initialzes its contents by iterating over
linesand then over individual pixels in each line. All the lines have to be at least as long as the first one.
- classmethod from_text(cls, text, color=None, background=0, colors=None)
Creates a new Pix and renders the specified text on it. It is exactly the size needed to fit the specified text. Newlines and other control characters are rendered as spaces.
If
coloris not specified, it will use yellow and red for the letters by default. Otherwise it will use the specified color, withbackgroundcolor as the background.Alternatively,
colorsmay be specified as a 4-tuple of colors, and then thecolorandbackgroundarguments are ignored, and the four specified colors are used for rendering the text.
- pixel(self, x, y, color=None)
If
coloris specified, sets the pixel at locationx,yto that color. If not, returns the color of the pixel at that location.If the location is out of bounds of the drawing surface, returns 0.
- box(self, color, x=0, y=0, width=self.width, height=self.height)
Draws a filled box with the specified
colorwith its top left corner at the specified location and of the specified size. If no location and size are specified, fills the whole drawing surface.
- blit(self, source, dx=0, dy=0, x=0, y=0, width=None, height=None, key=None)
Copied the
sourcedrawing surface onto this surface at location specified withdxanddy.If
x,y,widhtandheightare specified, only copies that fragment of thesourceimage, otherwise copies it whole.If
keycolor is specified, that color is considered transparent on the source image, and is not copied onto this drawing surface.
Bouncing Ball Tutorial
Let’s try to write a simple bouncing ball demo, where a single pixel moves around the screen and bounces off its edges. This will let us get familiar with the library.
Start by creating a file called “code.py” — that is where all our code will go. As long as such a file exists, PewPew will try to run it on startup and on reset. Later, when you finish working on your game, you can rename it to whatever you call your game, and then PewPew will fall back to running “main.py”, which contains the game selection menu.
To use the PewPew library, we need to first import it into our code. So we need to start with this line:
import pew
Then we need to tell the library to switch the display on and generally prepare
everything for displaying our ball. We do that by calling the init function
like this:
import pew


pew.init()
We will want our demo program to run all the time in a loop, so we will need an infinite loop. We can limit the loop’s speed to run 12 times a second, which is slow enough to see the movements, but not too slow:
import pew


pew.init()
while True:
    pew.tick(1/12)
Now, we will need an image that we will display on the screen. In PewPew,
images are represented as Pix objects. So we can create an empty image the
size of the display, and display it in our loop:
import pew


pew.init()
screen = pew.Pix()
while True:
    pew.show(screen)
    pew.tick(1/12)
Now we will add our pixel. We will make it start at coordinates 0, 0, and
we will draw it with color 3, which is the brightest:
import pew


pew.init()
screen = pew.Pix()
x = 0
y = 0
while True:
    screen.pixel(x, y, 3)
    pew.show(screen)
    pew.tick(1/12)
Now let’s make the pixel actually move:
import pew


pew.init()
screen = pew.Pix()
x = 0
y = 0
dx = 1
dy = 1
while True:
    x += dx
    y += dy
    screen.pixel(x, y, 3)
    pew.show(screen)
    pew.tick(1/12)
After running this, you will see a diagonal line on the display. That’s because the old positions of the pixel are not getting deleted. And the pixel keeps on going forever outside the screen. We can fix that. Let’s start by deleting the old position:
import pew


pew.init()
screen = pew.Pix()
x = 0
y = 0
dx = 1
dy = 1
while True:
    screen.pixel(x, y, 0)
    x += dx
    y += dy
    screen.pixel(x, y, 3)
    pew.show(screen)
    pew.tick(1/12)
We simply draw a black pixel at the old position before drawing a bright one at the new one. Since we only update the screen once a frame, those two operations are visible at the same time. Now, let’s make the pixel bounce off the edges:
import pew


pew.init()
screen = pew.Pix()
x = 1
y = 1
dx = 1
dy = 1
while True:
    screen.pixel(x, y, 0)
    if not 0 < x < 7:
        dx = -dx
    if not 0 < y < 7:
        dy = -dy
    x += dx
    y += dy
    screen.pixel(x, y, 3)
    pew.show(screen)
    pew.tick(1/12)
We had to move our starting point a bit, because otherwise it will get stuck in the corner. Now you should see our pixel going from one corner to the other. That’s neat, but a little bit boring. Maybe if we changed the starting position it would be better:
import pew


pew.init()
screen = pew.Pix()
x = 3
y = 1
dx = 1
dy = 1
while True:
    screen.pixel(x, y, 0)
    if not 0 < x < 7:
        dx = -dx
    if not 0 < y < 7:
        dy = -dy
    x += dx
    y += dy
    screen.pixel(x, y, 3)
    pew.show(screen)
    pew.tick(1/12)
Maybe we could affect the ball’s behavior with the buttons? For instance, pressing O could make it bounce horizontally, and pressing X vertically:
import pew


pew.init()
screen = pew.Pix()
x = 3
y = 1
dx = 1
dy = 1
while True:
    keys = pew.keys()
    screen.pixel(x, y, 0)
    if not 0 < x < 7 or keys & pew.K_O:
        dx = -dx
    if not 0 < y < 7 or keys & pew.K_X:
        dy = -dy
    x += dx
    y += dy
    screen.pixel(x, y, 3)
    pew.show(screen)
    pew.tick(1/12)
Could we have a nicer background than just black? Let’s try a check board:
import pew


pew.init()
screen = pew.Pix()
background = pew.Pix.from_iter((
    (1, 0, 1, 0, 1, 0, 1, 0),
    (0, 1, 0, 1, 0, 1, 0, 1),
    (1, 0, 1, 0, 1, 0, 1, 0),
    (0, 1, 0, 1, 0, 1, 0, 1),
    (1, 0, 1, 0, 1, 0, 1, 0),
    (0, 1, 0, 1, 0, 1, 0, 1),
    (1, 0, 1, 0, 1, 0, 1, 0),
    (0, 1, 0, 1, 0, 1, 0, 1),
))
x = 3
y = 1
dx = 1
dy = 1
while True:
    keys = pew.keys()
    screen.blit(background)
    if not 0 < x < 7 or keys & pew.K_O:
        dx = -dx
    if not 0 < y < 7 or keys & pew.K_X:
        dy = -dy
    x += dx
    y += dy
    screen.pixel(x, y, 3)
    pew.show(screen)
    pew.tick(1/12)
Instead of deleting our pixel with a black pixel, we simply copy the whole background all over the screen, and then draw our pixel in the new position.
How about making the ball larger:
import pew


pew.init()
screen = pew.Pix()
ball = pew.Pix.from_iter((
    (3, 2),
    (2, 1),
))
background = pew.Pix.from_iter((
    (1, 0, 1, 0, 1, 0, 1, 0),
    (0, 1, 0, 1, 0, 1, 0, 1),
    (1, 0, 1, 0, 1, 0, 1, 0),
    (0, 1, 0, 1, 0, 1, 0, 1),
    (1, 0, 1, 0, 1, 0, 1, 0),
    (0, 1, 0, 1, 0, 1, 0, 1),
    (1, 0, 1, 0, 1, 0, 1, 0),
    (0, 1, 0, 1, 0, 1, 0, 1),
))
x = 3
y = 1
dx = 1
dy = 1
while True:
    keys = pew.keys()
    screen.blit(background)
    if not 0 < x < 6 or keys & pew.K_O:
        dx = -dx
    if not 0 < y < 6 or keys & pew.K_X:
        dy = -dy
    x += dx
    y += dy
    screen.blit(ball, x, y)
    pew.show(screen)
    pew.tick(1/12)
We had to adjust the boundaries of the screen for the larger ball here.
Now experiment with this code yourself and see what you can make.
Sokoban Tutorial
When looking for simple games to implement on PewPew, it helps to look back to the times when computers were so young and underpowered, compared to today, that simple games were all they could run. One of those games is Sokoban. Let’s try to write a Sokoban for PewPew!
Sokoban is a puzzle game where you play a warehouse worker who has to push packing crates around until they are where they are supposed to be, which is indicated by marks on the floor. Unfortunately, your warehouse is a bit labyrinthine, and you can only push the crates, not pull them, so you need to plan carefully: if you push a crate into a corner, you can never get it back out.
As in the Bouncing Ball Tutorial, create a file named code.py containing the basic setup and game loop. Instead of a blank screen, we put the game board on the screen right away: some walls, indicated by color 1 (dim or green), surrounding free space of color 0 (black).
import pew

pew.init()
screen = pew.Pix.from_iter((
    (1, 1, 1, 1, 1, 1, 1, 1),
    (1, 0, 0, 0, 0, 0, 0, 1),
    (1, 0, 0, 0, 0, 0, 0, 1),
    (1, 0, 0, 0, 0, 0, 0, 1),
    (1, 0, 0, 0, 0, 0, 0, 1),
    (1, 0, 0, 0, 0, 0, 0, 1),
    (1, 0, 0, 0, 0, 0, 0, 1),
    (1, 1, 1, 1, 1, 1, 1, 1),
))

while True:
    keys = pew.keys()

    pew.show(screen)
    pew.tick(1/6)
Let’s add a player character, indicated by a bright pixel, that can be moved around with the directional keys. We erase the pixel in the old position at the beginning of the loop by replacing it with 0 (black floor), then move the position if any keys are pressed, and finally paint it at the new position:
...
    (1, 1, 1, 1, 1, 1, 1, 1),
))

x = 4
y = 1

while True:
    screen.pixel(x, y, 0)
    keys = pew.keys()
    if keys & pew.K_UP:
        y -= 1
    elif keys & pew.K_DOWN:
        y += 1
    elif keys & pew.K_LEFT:
        x -= 1
    elif keys & pew.K_RIGHT:
        x += 1
    screen.pixel(x, y, 3)
    pew.show(screen)
    pew.tick(1/6)
Note that we use elif (Python’s shorthand for “else, if”) to check for
different keys, which means that we can only move in one of the four directions
at once. If we used if for every key, we could move e.g. right and down at
the same time, that is, move diagonally. (We could also move up and down at the
same time, which means not moving at all.) For Sokoban, we don’t want to be able
to move diagonally, only horizontally and vertically, so we use elif.
If you try this, you will notice that the player can move through walls and outside of the screen, leaving holes in the walls. Let’s fix that.
Instead of moving right away when a key is pressed, we first record in what
direction we want to move in the variables dx and dy (the d stands
for “delta” or “difference”, because this is going to be the difference between
the new and old position). Then we look ahead what is in that direction, the
target pixel, and only move when it is “floor” (0).
...
while True:
    screen.pixel(x, y, 0)
    keys = pew.keys()
    dx = 0
    dy = 0
    if keys & pew.K_UP:
        dy = -1
    elif keys & pew.K_DOWN:
        dy = 1
    elif keys & pew.K_LEFT:
        dx = -1
    elif keys & pew.K_RIGHT:
        dx = 1
    target = screen.pixel(x+dx, y+dy)
    if target == 0:
        x += dx
        y += dy
    screen.pixel(x, y, 3)
    pew.show(screen)
    pew.tick(1/6)
Now that that works as it should, let’s add the next element, a crate, represented by a bright pixel (3):
...
    (1, 1, 1, 1, 1, 1, 1, 1),
    (1, 0, 0, 0, 0, 0, 0, 1),
    (1, 0, 0, 0, 0, 0, 0, 1),
    (1, 0, 0, 0, 0, 0, 0, 1),
    (1, 0, 0, 3, 0, 0, 0, 1),
    (1, 0, 0, 0, 0, 0, 0, 1),
    (1, 0, 0, 0, 0, 0, 0, 1),
    (1, 1, 1, 1, 1, 1, 1, 1),
...
When a crate is in front of a player wanting to move, it will be pushed away one pixel further in the same direction, and the player can move:
...
    if target == 0:
        x += dx
        y += dy
    elif target == 3:
        screen.pixel(x+dx+dx, y+dy+dy, 3)
        x += dx
        y += dy
    screen.pixel(x, y, 3)
    pew.show(screen)
    pew.tick(1/6)
There is no need to erase the crate at its old position, because it will immediately be overwritten with the player anyway.
Test it and you will notice that you can push the crate through walls, punching holes in the walls again. We obviously need to check what’s behind the crate first, before we decide to move it.
...
    target = screen.pixel(x+dx, y+dy)
    behind = screen.pixel(x+dx+dx, y+dy+dy)
    if target == 0:
        x += dx
        y += dy
    elif target == 3 and behind == 0:
        screen.pixel(x+dx+dx, y+dy+dy, 3)
        x += dx
        y += dy
...
That works, but we now have two bright pixels on the screen, the player and the
crate, and when the player isn’t moving, you can’t tell which is which. We still
have an unused color available that we could use for one of them, 2 (medium
brightness or red), but we’d like to use that for the marks on the floor later.
Instead, let’s make the player blink. That needs another variable to keep track
of what the last state was, which is then reversed after every time the player
is drawn. A natural choice for such a variable with two states is a boolean with
its two values True and False.
...
x = 4
y = 1
blink = True

while True:
...
...
        y += dy
    screen.pixel(x, y, 3 if blink else 2)
    blink = not blink
    pew.show(screen)
    pew.tick(1/6)
Time for the last missing element: the marks on the floor. We represent them by color 2:
...
    (1, 1, 1, 1, 1, 1, 1, 1),
    (1, 0, 0, 0, 0, 0, 0, 1),
    (1, 0, 0, 0, 0, 0, 0, 1),
    (1, 0, 0, 0, 0, 0, 0, 1),
    (1, 0, 0, 3, 0, 2, 0, 1),
    (1, 0, 0, 0, 0, 0, 0, 1),
    (1, 0, 0, 0, 0, 0, 0, 1),
    (1, 1, 1, 1, 1, 1, 1, 1),
...
And the player and crates can move over them just like over bare floor:
...
    behind = screen.pixel(x+dx+dx, y+dy+dy)
    if target in {0, 2}:
        x += dx
        y += dy
    elif target == 3 and behind in {0, 2}:
        screen.pixel(x+dx+dx, y+dy+dy, 3)
        x += dx
        y += dy
...
Try it out, and you will find the next problem: the mark is erased by either player or crate moving over it. This is because when overwriting the respective pixel with 2 or 3 to draw the player, we lose the information whether there was a mark there, and in the first line of the next loop, we will restore bare floor (0) even when there should have been a mark (2). We somehow need to preserve this information.
To solve this, there is a trick we can use. So far, we have always used pixel values 0–3 for black, dim, medium, bright or black, green, red, orange. These are all the colors that our hardware can display. But what happens if we use higher numbers? If you try it, you will find that 4 produces black, 5 produces dim/green again, 6 medium/red, 7 bright/orange, 8 black, and so on – the pattern just repeats every four steps. In other words, you can add 4 to a pixel value without changing its apparent color.
We can use this to our advantage: If we represent a crate-on-bare-floor as 3 and a crate-on-mark as 7, they will both look the same, but we can still distinguish them in the code. The same goes for the player: if the pixel blinks between 2 and 3, it’s on bare floor, if it blinks between 6 and 7, it’s on a mark.
For the player, this needs to be applied on the line where we erase the player and restore the floor (with or without mark), and on the line where we draw the new player over the previous floor or crate (each with or without mark):
...
while True:
    screen.pixel(x, y, 0 if screen.pixel(x, y) < 4 else 2)
    keys = pew.keys()
...
...
        y += dy
    screen.pixel(x, y, (3 if blink else 2) + (4 if screen.pixel(x, y) in {2, 7} else 0))
    blink = not blink
...
For the crate, it needs to be applied on the line where we detect a crate in front of the player and on the line where we draw the new crate over the previous floor:
...
    if target in {0, 2}:
        x += dx
        y += dy
    elif target in {3, 7} and behind in {0, 2}:
        screen.pixel(x+dx+dx, y+dy+dy, 3 if behind == 0 else 7)
        x += dx
        y += dy
...
Test this and check that you can now both walk over the mark and push the crate over the mark without erasing it. Congratulations – with this, our game mechanics are now complete! The game still does not detect when all crates are placed on their marks and therefore the level is solved, though. Let’s add that.
The easiest way of checking that is to count all bare marks: if none of them are
left, the puzzle is solved. So, iterate over all pixels (with an outer loop over
all rows and an inner loop over the pixels of each row) and count up every time
you see a bare mark. If the count remains 0, break out of the top-level while
True loop, at which point the program ends because there’s no more code after
the loop. It’s important to do this before we draw the player, who might stand
on a mark and thereby hide it from the counting otherwise.
...
elif target in {3, 7} and behind in {0, 2}:
screen.pixel(x+dx+dx, y+dy+dy, 3 if behind == 0 else 7)
x += dx
y += dy
count = 0
for b in range(8):
for a in range(8):
if screen.pixel(a, b) == 2:
count += 1
if count == 0:
break
screen.pixel(x, y, (3 if blink else 2) + (4 if screen.pixel(x, y) in {2, 7} else 0))
blink = not blink
pew.show(screen)
pew.tick(1/6)
You can test this, but testing it with only one crate is not a very general test, so add another one, and a mark for it.
...
(1, 1, 1, 1, 1, 1, 1, 1),
(1, 0, 0, 0, 0, 0, 0, 1),
(1, 0, 3, 0, 0, 0, 0, 1),
(1, 0, 0, 0, 0, 0, 0, 1),
(1, 0, 0, 3, 0, 2, 0, 1),
(1, 0, 2, 0, 0, 0, 0, 1),
(1, 0, 0, 0, 0, 0, 0, 1),
(1, 1, 1, 1, 1, 1, 1, 1),
...
After you verify that the completion detection works properly – the game exits when both crates are on their marks, no earlier and no later – it’s now up to you to make the game more interesting by adding more walls to the level. Or maybe you want to extend the game to support multiple levels of increasing difficulty? Or add a nice reward animation for a completed level? Have fun!
Here is the complete code in its final state again:
import pew
pew.init()
screen = pew.Pix.from_iter((
(1, 1, 1, 1, 1, 1, 1, 1),
(1, 0, 0, 0, 0, 0, 0, 1),
(1, 1, 3, 1, 0, 0, 0, 1),
(1, 0, 0, 1, 0, 1, 1, 1),
(1, 0, 0, 3, 0, 2, 0, 1),
(1, 0, 2, 1, 0, 1, 0, 1),
(1, 0, 0, 0, 0, 1, 0, 1),
(1, 1, 1, 1, 1, 1, 1, 1),
))
x = 4
y = 1
blink = True
while True:
screen.pixel(x, y, 0 if screen.pixel(x, y) < 4 else 2)
keys = pew.keys()
dx = 0
dy = 0
if keys & pew.K_UP:
dy = -1
elif keys & pew.K_DOWN:
dy = 1
elif keys & pew.K_LEFT:
dx = -1
elif keys & pew.K_RIGHT:
dx = 1
target = screen.pixel(x+dx, y+dy)
behind = screen.pixel(x+dx+dx, y+dy+dy)
if target in {0, 2}:
x += dx
y += dy
elif target in {3, 7} and behind in {0, 2}:
screen.pixel(x+dx+dx, y+dy+dy, 3 if behind == 0 else 7)
x += dx
y += dy
count = 0
for b in range(8):
for a in range(8):
if screen.pixel(a, b) == 2:
count += 1
if count == 0:
break
screen.pixel(x, y, (3 if blink else 2) + (4 if screen.pixel(x, y) in {2, 7} else 0))
blink = not blink
pew.show(screen)
pew.tick(1/6)
You can also find this at https://github.com/pewpew-game/game-sokoban.
Pewmulator
Pewmulator is an emulator for the PewPew library that lets you play the games writen for the PewPew devices on your computer. It comes in the form of a Python 3 library that uses PyGame under the hood to implement all necessary parts of the PewPew library.
Note that the code is then being executed with Python 3 and not CircuitPython, so there may be some differences. The most obvious difference is the amount of RAM memory available — so if you write a game in Pewmulator, chances are it won’t run on PewPew because of lack of memory.
You can get the library from the github repository. Just place the pew.py file
alongside the code of your game, and run your game with Python 3.
PewPew Devices
There are several different PewPew devices out there, and a number of further devices can be made compatible with PewPew by using the right libraries. You can even build your own device!
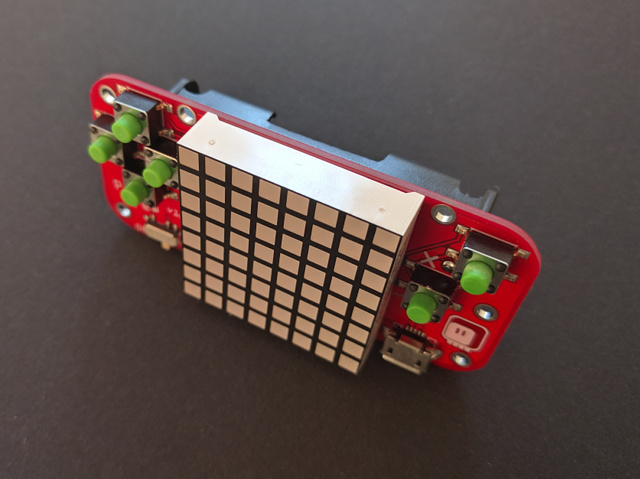
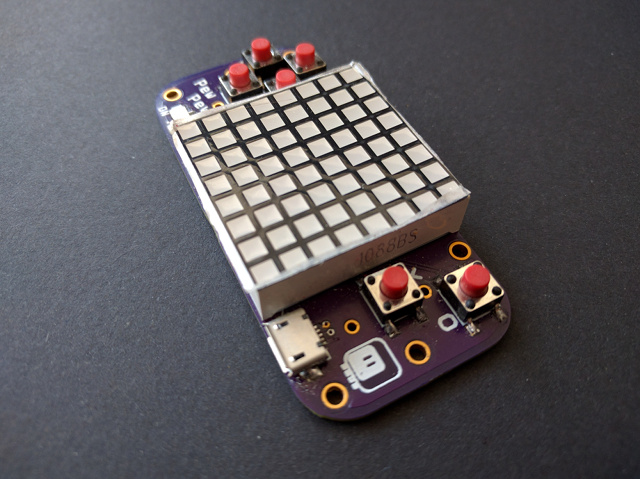
PewPew Lite FeatherWing
PewPew Lite is a FeatherWing that you can use with any of the Adafruit Feather development boards. It’s exactly the size of all FeatherWings, with a green-red display 2cm on a side, six clicky buttons and a switch for an optional battery.
Hardware
PewPew Lite FeatherWing
PewPew Lite is a shield for the Adafruit Feather series of development boards (a FeatherWing, as they call them). You put it on top of one of their boards, and then program that board (preferably in CircuitPython) to create games and other interactive programs.
Specification |
|
|---|---|
Display |
8×8 4-color LED matrix |
Input |
6 buttons |
Sound |
no sound |
Interface |
2-wire I²C at address 0x70 |
Controller |
Holtek HT16K33 |
Battery |
Optional 3.7V 100mAh LiPO (not included) |
The shield contains six buttons and an eight-by-eight bi-color LED display, capable of displaying four different colors (black, green, red and yellow). It also includes a HT16K33 chip that handles the display and the buttons, so that you can focus on just writing the code for your game. Optionally, you can add a LiPO battery to it, to make the whole thing into a portable handheld game console. The shield includes a power switch for that battery.
Open Development
This hardware is developed in the open, and all the designs and related materials are publicly available under a permissive license. You are free to inspect how it is build, build your own, improve and extend the design, and even sell your own versions.
The designs are available in the project’s repository.
Buy a Kit
If you want to buy a complete kit that doesn’t require soldering, you can find one at Tindie.
Assembly and Setup
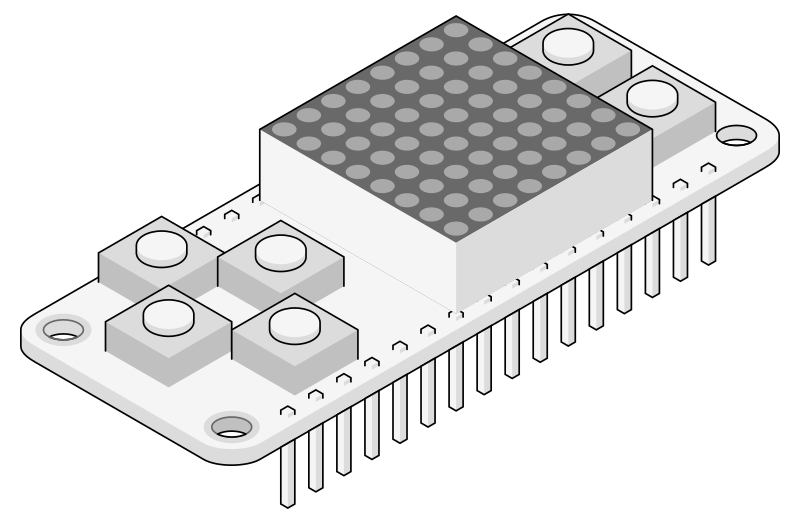
The PewPew FeatherWing comes without the pin headers and LED matrix attached, so that some simple soldering is required before using it.
Basic Assembly
The simplest way to assemble the PewPew board is to use an Adafruit Feather board that supports CircuitPython (the Feather M0 Express works great for this) with female pin headers, and to solder the male pin headers onto the PewPew FeatherWing. Afterwards, insert the LED Matrix into place, solder its pins from the bottom, and trim them with wire cutters.
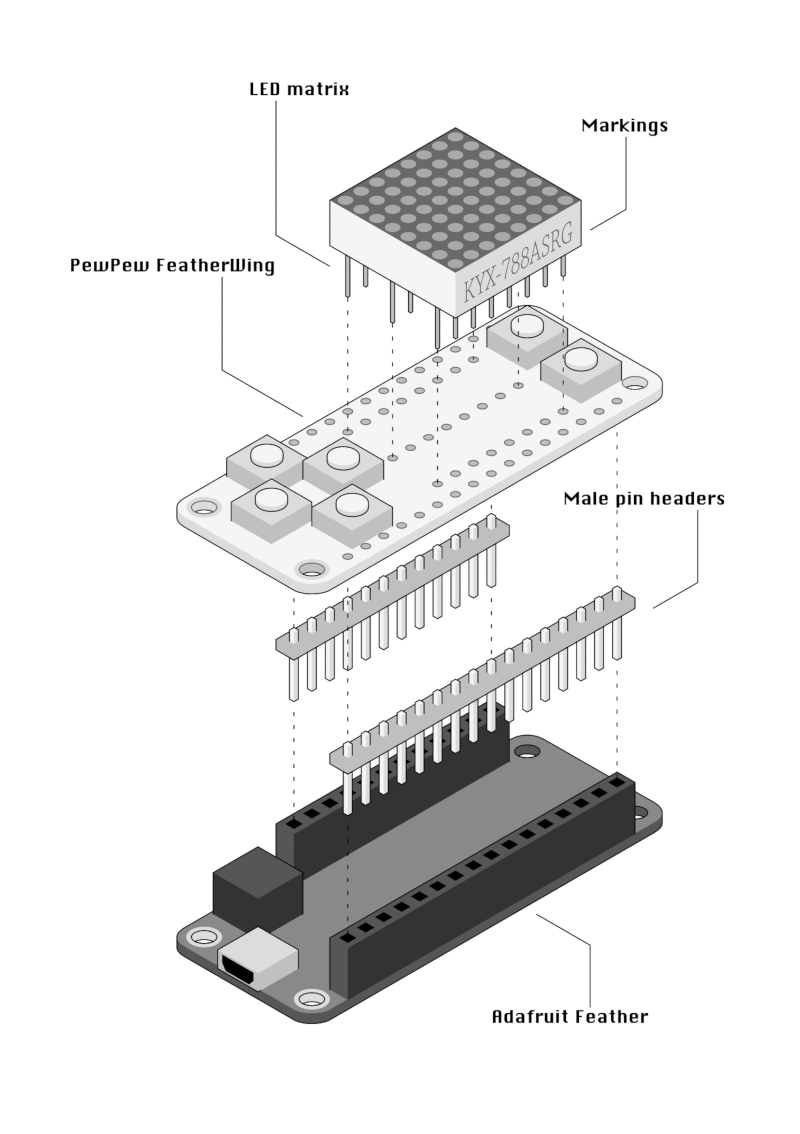
Make sure to insert the LED Matrix in correct orientation – with the markings in the same direction as the “down” button. Otherwise the colors will be wrong, and the image will be flipped.
Note that you should solder the pin headers first, and then solder the LED matrix. Trying to do it in the opposite order may lead to damaging the matrix with your soldering iron.
Note
The Adafruit Feather board is not included in the kit.
Making it Flatter
The basic assembly is fine, but it’s good 2cm thick. You can make the whole thing much thinner by applying a number of tricks. First, use the short female pin headers for the Adafruit Feather. Second, move the plastic on your male pin headers to the end of the header, insert the header from the top, and try it with the Feather to see how long the pins need to be. Then solder them, and trim the parts sticking out from the top with wire cutters. This way the PewPew FeatherWing can sit right on top of the battery plug of the Feather.
Note
Note that the short female headers are not included in the kit.
Optional Battery
To make the PewPew even more portable, you can add a small LiPO battery (the 100mAh batteries are about the right size). The FeatherWing even has a power switch built-in that you can use. Just solder the battery leads to the two holes marked “+” for the red wire, and “-” for the black wire. Be very careful to not short the battery wires while you are doing that. Then you can use two-sided tape to stick the battery on the underside of the FeatherWing, sandwiching it between the two boards. You may need to add some electric tape to prevent the metal body of the battery from shorting things on the boards.
Note
Note that the battery is not included in the kit.
Software Setup
All the example programs are written using CircuitPython, so you will need to get that running on your Feather board. Fortunately Adafruit provides a lot of tutorials about how to do it. Some of the boards (like the M0 Express) even come with CircuitPython already loaded on them. Please see this guide.
Once you have CircuitPython running on the board, you need to copy the
pew.mpy file to it. That’s the main library that contains all the functions
needed to use the PewPew hardware.
In addition, you need to copy your program onto the board. You have to name it
main.py for it to be started automatically on power-up. Later on we will
see how we can use a menu program that will let you choose what to run (you
have to rename the menu.py to main.py to have it run at start).
You can get all the files from the project’s repository, and the compiled files are available from the releases page.
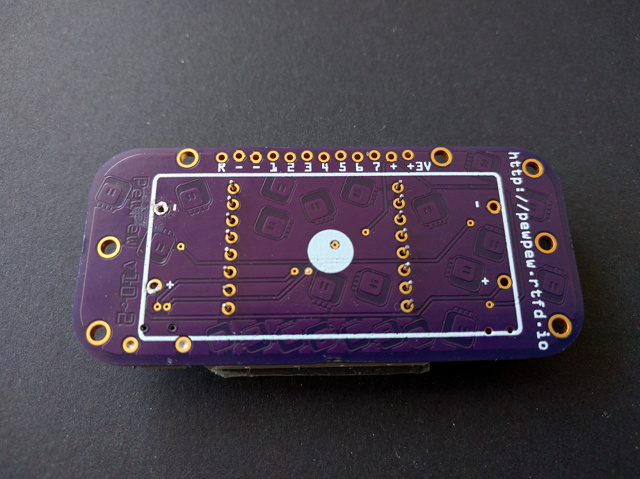
PewPew 10.2
PewPew 10.2 is a standalone version of the PewPew device, designed specifically to be cheap and simple to use in workshop settings. You only need two AAA batteries and a micro-USB cable (with a computer to plug it into) to start using it.
Hardware
PewPew Standalone v10.2
PewPew Standalone is a handheld device, it doesn’t require any additional hardware, except for two 1.5V AAA batteries.
Specification |
|
|---|---|
Display |
8×8 red LED matrix |
Input |
6 buttons |
Sound |
no sound |
Interface |
12-pin connector at the back |
Controller |
Atmel SAMD21 |
Battery |
2 x AAA 1.5V alkaline (not included) |
The device includes a display, six buttons, on-off switch, USB port and a battery holder. The batteries are required for operation, it can’t be powered from the USB port. There is also a 12-pin connector on the back of the device that can be used for connecting other electronic devices.
The 12-pin Connector
Label |
Name |
Function |
|---|---|---|
|
Reset |
Ground this pin to perform hard reset. |
|
GND |
Negative power and ground. There are 2 pins. |
|
board.P1 |
DigitalIO, SWC, SPI-MISO/MOSI, PWM |
|
board.P2 |
DigitalIO, SWD, SPI-SCK, PWM |
|
board.P3 |
DigitalIO, I2C-SDA, SPI-MISO/MOSI, PWM |
|
board.P4 |
DigitalIO, I2C-SCL, SPI-SCK, PWM |
|
board.P5 |
DigitalIO, ADC, DAC, PWM, TouchIO |
|
board.P6 |
DigitalIO, ADC, TouchIO |
|
board.P7 |
DigitalIO, SPI-MISO/MOSI, UART, TouchIO |
|
VCC |
Positive 3V power. There are 2 pins. |
You can insert a male header into the holes at the back of the device and plug it into a breadboard to easily gain access to the pins.
Updating the Firmware
Download a
.uf2file from https://circuitpython.org/board/pewpew10/.Connect the PewPew to your computer using a USB cable. It appears as a disk named CIRCUITPY.
Back up all your files, as the update might delete them.
“Eject” or “safely remove” the
CIRCUITPYdisk.Connect the
Rand-pins on the 12-pin connector twice in short succession, like a double-click. Seen from the front, these are the two rightmost pins. If you added a male pin header, this is easily done by touching any metal part to the two pins. The PewPew display should go black and a disk named TRINKETBOOT should appear.If the CIRCUITPY disk reappears instead and the PewPew display shows the scrolling menu (or whatever else you installed as
main.py), try the double-click again, it can take a few tries to get the rhythm right.Copy the downloaded
.uf2file to the TRINKETBOOT disk. When it’s done, which should take no longer than a few seconds, TRINKETBOOT disappears, CIRCUITPY reappears, and your PewPew is now running the new CircuitPython version.If needed, copy all your files back. Also, if you upgraded to a new major version, you will need to replace any
.mpyfiles you have on your device, with ones compiled for the new version.
Open Development
This hardware is developed in the open, and all the designs and related materials are publicly available under a permissive license. You are free to inspect how it is build, build your own, improve and extend the design, and even sell your own versions.
The designs are available in the project’s repository.
Buy a Kit
If you want to buy a kit that you only need to solder, you can find one at Tindie.
Assembly
Unless you are participating in a workshop, the device comes unassembled. There are three parts: the printed circuit board with the buttons and the electronics, the display, and the battery holder. To assemble it you will need a soldering iron, wire cutters, solder and two-sided tape. You will also need two AAA 1.5V batteries, a micro-USB cable and a computer with a working USB port.
Display
You start the assembly by attaching and soldering the display. Insert the provided LED matrix into the 16 holes in the middle of the printed circuit board, making sure that the side of the matrix with text on it faces right, towards the two fire buttons. You may need to straighten the pins a little if they bent during the transport.
Warning
If you solder the display in the wrong orientation, it will not work correctly. Please make sure the orientation is correct before you start soldering.
Once the matrix is inserted, flip the device up-side-down, make sure that the display aligns flush with the sides (there is a little wiggle room), and solder each of the pins. To do that, touch the tip of a hot soldering iron to the pin and the ring around the hole at the same time, wait a second for them to become hot, and then touch them with the solder wire, melting enough solder to fill the hole.
Note
If you are new to soldering, you can find soldering tutorials on the Internet.
Once all 16 pins of the matrix are soldered, use the wire cutters to cut them flush with the circuit board.
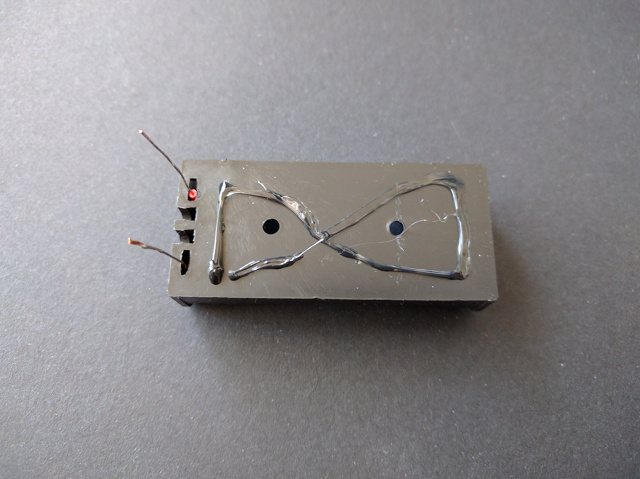
Battery
The next step is connecting and attaching the battery holder. First, make sure that the wires of the battery holder go through the holes in the plastic that are furthest apart. If they go through the holes that are close together, you will need to move them back, and thread them through the correct holes. Once you have done that, cut both wires to about 1cm length and remove the insulation from them with the wire cutters (please don’t use your teeth). Twist the strands of each of the wire, so that they are easier to move through the holes in the circuit board. Next, place two-sided tape on the battery holder, and attach it to the circuit board so that the two wires go through the holes marked + and - (make sure the red wire goes to +, and the black one to -). There are two sets of such holes, pick the correct one depending on what order the wires come out of your battery holder.
Warning
It is very important to pay attention to the battery polarity, as this device doesn’t have any kind of reverse polarity protection, and coonnecting the batteries in reverse will damage it.
Flip the device to the top side, and use the soldering iron to solder the two wires sticking out of the holes in the circuit board. Be careful to not touch the plastic of the buttons with your iron, as it will melt. Finally, cut the excess wires with your wire cutters. Your device is ready.
Insert two AAA 1.5V batteries into the battery holder, switch it on, and you should see text “snake” scrolling on the display.
PewPew M4
PewPew M4 is a CircuitPython graphical handheld game console.
Hardware
Specifications
Specification |
|
|---|---|
Display |
160x128 color TFT |
Input |
7 buttons |
Sound |
7mm buzzer |
Interface |
Micro USB |
Controller |
SAMD51 ARM Cortex M4 |
Battery |
2xAAA 1.5V (not included, optional) |
Open Development
This hardware is developed in the open, and all the designs and related materials are publicly available under a permissive license. You are free to inspect how it is build, build your own, improve and extend the design, and even sell your own versions.
The designs are available in the project’s repository.
Assembly and Setup
Electronics
If you bought a kit, you will receive this part already assembled and programmed.
Schematic
This is the schematic of the device.

Printed Circuit Board
A printed circuit board is necessary for assembling the electronic part of the console. You can find the gerber files in the project’s repository.


If you need to make modifications to the PCB designs, the Fritzing file is also available in the project’s repository.
Bill of Materials
You will need the following components:
Part/Designator |
Manufacture Part Number/Description |
Quantity |
Remarks/Links |
|---|---|---|---|
U1 |
ATSAMD51G19A-MU |
1 |
|
U2 |
ST7735R 1.8inch TFT |
1 |
|
U3 |
AP2112K-3.3TRG1 ldo |
1 |
|
C1 C2 |
10uF 0805 capacitor 3V |
2 |
|
R1 |
10Ohm 0805 resistor |
1 |
|
R2 |
10kOhm 0805 resistor |
1 |
|
R3 |
470Ohm 0805 resistor |
1 |
|
X1 |
10118193-0001LF microusb socket |
1 |
|
X2 |
MK12C02 switch |
1 |
|
X3 |
HYG7525 |
1 |
|
X4 |
2xAAA battery holder |
1 |
|
BU BD BL BR BZ BX BO |
SKRPABE010 switch 1.57N |
7 |
|
two-sided tape |
1.5cm |
for attaching the battery holder https://www.aliexpress.com/item/33030272723.html |
The positions of the components are marked on the PCB’s silkscreen, and there is also a pick-and-place file included with the gerbers.
Please make sure to use the correct set of holes for the battery holder, depending on the polarity of the particular model you have. If you need to use the holes on the side of the display connector, it’s best to solder the battery holder first, and the display later.
Bootloader
You will find the UF2 bootloader binary and sources in the project’s repository. In order to flash it to the chip on the PCB, you will need an SWD-capable programmer, such as JLink.
Connect your programmer to the 12-pin connector at the bottom as follows:
Programmer |
Device |
|---|---|
SWDCLK |
1 |
SWDIO |
2 |
RST |
R |
VCC |
|
GND |
|
While programming, the device needs to be powered either from battery, from
USB, or with 3.3V through the + and - pins.
If programming from the command line, use the following commands:
JLinkExe -if SWD -device ATSAMD51G19A -speed 4000kHz
J-Link> connect
J-Link> erase
J-Link> loadbin pewpew-m4-v8-bootloader.bin 0
J-Link> g
J-Link> qc
After this, a PEWBOOT disk should become visible over USB. The UF2 files
can be copied to that disk to flash them on the device. To force the device
into a bootloader mode again, the R pin needs to be shorted with the -
twice.
Firmware
The CircuitPython firmware can be downloaded form the official CircuitPython
downloads page. The UF2 file just needs
to be copied over USB to the PEWBOOT disk.
Case
The case consists of two layers of acrylic parts, held together with six screws, and four button caps, attached to the switches with pieces of two-sided tape or glue. The whole assembly is shown below.

Acrylic Layers
The acrylic parts are laser-cut from 2mm clear and 3mm translucent sheets.


It’s possible to cut more than one set of parts from a single sheet, so you may want to modify the provided designs. Please also note that the design files include dimensions, which should be ignored by the cutter.
Bill of Materials
Description |
Quantity |
Remarks/Links |
|---|---|---|
M1.8 6mm flat-head self-tapping screw |
6 |
|
2mm clear transparent acrylic parts |
1 |
see pewpew-m4-v8-2mm.svg |
3mm orange translucent acrylic parts |
1 |
see pewpew-m4-v8-3mm.svg |
Project Reposiotory
All the design files can be found in the project’s repository.
Connecting Electronics
This section contains some examples to get you started with enhancing your PewPew with various external electronic components.
Light-Emitting Diodes (LEDs)

An LED must be connected in the right orientation: it has a negative lead (cathode) and a positive lead (anode). The cathode is usally marked by being shorter and by a flat part on the rim of the transparent body. Nothing breaks it you insert it the wrong way, it just doesn’t light up.
An LED needs a resistor connected in series, otherwise too much current flows through it and destroys it. It doesn’t matter which way around and on which side of the LED the resistor is placed.
An RGB LED is simply three individual LEDs in the same case, with their cathodes (or anodes) connected together to the longest lead, and the anodes (or cathodes) exposed individually. We use a larger resistance on the green LED because otherwise it is much brighter than the other two, this brings them closer to making white together.
To turn LEDs on and off, we can use any of the PewPew pins as digital outputs.
>>> import board
>>> import digitalio
>>> led = digitalio.DigitalInOut(board.P1)
>>> led.direction = digitalio.Direction.OUTPUT
>>> led.value = 1
>>> led.value = 0
Pulse-Width Modulation (PWM)
To dim an LED, we can make use of the microcontroller’s ability to blink an output very quickly, with a fixed frequency, but a variable duration of the “on” part of the period. This is called pulse-width modulation (PWM) and is easier for a microcontroller to do than outputting a continuously variable voltage. The ratio of the “on” part to the whole period is called duty cycle and is specified as an integer from 0 (always off) to 65535 (always on).
>>> import board
>>> import pwmio
>>> r = pwmio.PWMOut(board.P1)
>>> g = pwmio.PWMOut(board.P3)
>>> b = pwmio.PWMOut(board.P4)
>>> r.duty_cycle = 0
>>> r.duty_cycle = 100
>>> r.duty_cycle = 10000
>>> r.duty_cycle = 65535
>>> import time
>>> import math
>>> while True:
...     r.duty_cycle = int(65535*(0.5 + 0.5*math.sin(time.monotonic())))
...     g.duty_cycle = int(65535*(0.5 + 0.5*math.sin(time.monotonic() - 2.1)))
...     b.duty_cycle = int(65535*(0.5 + 0.5*math.sin(time.monotonic() - 4.2)))
...
#   ^ delete the indenting spaces and press return to end the block
# press ctrl-C to exit from the infinite loop
Potentiometer

A potentiometer is an adjustable resistor. As its schematic symbol illustrates, it consists of a track of resistive material on which a wiper can slide. The left and right end of the track are connected to the outer pins of the part, the wiper to the middle pin. When the wiper is moved to the left end, the resistance between the left and middle pins is approximately zero. As the wiper is moved to the right, it continuously increases until it reaches the full value when the wiper is at the right end. Conversely, the resistance between the middle and right pins decreases.
When the left and right ends of the track are connected to ground (0V) and +3V (which makes a small current flow through it), the potentiometer acts as a variable voltage divider: the middle pin smoothly moves from 0V to 3V as the wiper is moved from left to right.
We can measure this voltage using an analog-to-digital converter (ADC) contained in the microcontroller. On the PewPew, ADCs are available on pins 5, 6, and 7. They linearly convert a voltage between zero and the full supply voltage into an integer between 0 and 65535.
An analog joystick is a combination of two potentiometers.
Light-Dependent Resistor (LDR)

The resistance of an LDR decreases when light shines onto it.
We can combine it to a voltage divider with a fixed resistor and measure the resulting variable voltage using an ADC.
>>> import board
>>> import analogio
>>> adc = analogio.AnalogIn(board.P5)
# potentiometer turned to the left
>>> adc.value
48
# potentiometer turned to the right
>>> adc.value
65520
>>> import pew
>>> pew.init()
>>> screen = pew.Pix()
>>> while True:
...     screen.blit(screen, 0, 0, 1, 0, 7, 8)
...     screen.box(0, 7, 0, 1, 8)
...     screen.pixel(7, 7 - (adc.value >> 13), 3)
...     pew.show(screen)
...     pew.tick(0.1)
...
#   ^ delete the indenting spaces and press return to end the block
# press ctrl-C to exit from the infinite loop
Addressable LED Strip

These strips can be several meters long and contain hundreds of LEDs, each of them individually controllable. Each of the addressable LED packages contains three LEDs (red, green, blue; some also have a fourth white one) and a controller chip with communication input and output pins. They are daisy-chained on the strip so that the output of one goes to the input of the next. The input of the first one is connected to the microcontroller, which sends out a stream of color values. The first LED takes the first set of them and keeps it for itself, then passes all the rest through to the next one, and so on, until the last LED on the strip only receives the last set of values left for it.
Addressable LEDs exist in two common varieties, “Neopixels” (WS2812B, SK6812), which have one communication line (data), and “Dotstars” (APA102, SK9822), which have two (clock and data). They are all intended for 5 V, but the Dotstars used here happen to work acceptably on 3 V.
Powering 3 addressable LEDs from the PewPew battery or USB supply works, but for longer strips you need a separate power supply (unless you keep very few LEDs on at any time). Each LED can use up to 60 mA (3*20) – multiplied by a large number, this quickly overwhelms small power supplies.
Arrows on the strip indicate the data flow direction – make sure you connect the controller to the input end of the strip. The 5V and GND supply lines run through the whole strip and connect all LEDs in parallel, these can be connected on either end (or even both).
Libraries required: https://github.com/adafruit/Adafruit_CircuitPython_Pixelbuf and https://github.com/adafruit/Adafruit_CircuitPython_Dotstar
>>> import adafruit_dotstar
>>> import board
>>> d = adafruit_dotstar.DotStar(board.P2, board.P1, 3, pixel_order=adafruit_dotstar.RBG)
>>> d
[[0, 0, 0, 1.0], [0, 0, 0, 1.0], [0, 0, 0, 1.0]]
# [R (0-255), G (0-255), B (0-255), brightness (0.0-1.0 in steps of 1/31)]
>>> d[0] = 0x100000
>>> d[0] = 0x001000
>>> d[0] = 0x000010
>>> d[0] = (20, 10, 0)
>>> d.fill(0)
>>> import time
>>> import math
>>> d.brightness = 0.2
>>> while True:
...     for i in range(3):
...         d[i] = [int(255*math.sin(time.monotonic() - 0.5*j + 2.1*i)**12) for j in range(3)]
...
>>> d.deinit()
# send raw data using a lower-level interface without the adafruit_dotstar library
>>> import busio
>>> spi = busio.SPI(board.P2, MOSI=board.P1)
>>> spi.try_lock()
True
>>> spi.write(b'\x00\x00\x00\x00\xff\x33\x00\x00\xff\x00\x33\x00\xff\x00\x00\x33\xff')
>>> spi.unlock()
>>> spi.deinit()
Piezo Speaker

A piezo speaker (also called passive buzzer) converts electricity into sound using a crystal that expands and contracts when placed in an electric field. It is not suitable for high-quality music, but good for simple beeps, and uses very little power. It doesn’t matter which way you connect it.
The PewPew 10 lacks most of the advanced sound generation capabilities of CircuitPython because they didn’t fit in the small flash memory of the microcontroller, but we can generate simple square waves using the pulse-width modulation facility (described on the Light-Emitting Diodes (LEDs) page).
(There is a digital-to-analog converter (DAC) on pin 5 that can be used with the analogio module, but feeding it new values regularly enough for sound is hard without support from the firmware.)
>>> import board
>>> import pwmio
>>> p = pwmio.PWMOut(board.P4, variable_frequency=True)
>>> p.duty_cycle = 32768
# initial frequency is 500 Hz
>>> p.frequency = 250
>>> p.frequency = 1000
>>> p.duty_cycle = 0

>>> import time
>>> def play(tune):
...     p.duty_cycle = 32768
...     for f, d in tune:
...         p.frequency = f
...         time.sleep(d)
...     p.duty_cycle = 0
...
>>> play(((440, 0.2), (550, 0.1), (587, 0.1), (660, 0.1)))
Accelerometer

An accelerometer senses gravity and acceleration using microscopic mechanical parts that are integrated on a silicon chip. It can be used to detect orientation, motion, and gestures like tapping.
The LIS3DH is a low-cost model of accelerometer among many others by different manufacturers. It is a digital device that talks to the microcontroller bidirectionally using a protocol named I²C (Inter Integrated Circuit). I²C uses two signal lines, SDA (serial data) and SCL (serial clock), plus a common ground. Additionally, I²C requires two resistors (pull-up resistors) between each of the signal lines and the positive supply voltage (VCC), this is already done on our LIS3DH breakout board. Multiple devices can be connected to the same I²C bus, the microcontroller can identify them by their address.
To avoid having to remember the raw commands that the microcontroller needs to send over I²C to talk to the accelerometer (they are documented in the data sheet of the part), we use a library that encapsulates that knowledge and abstracts away the specifics of the device. Check the documentation at https://learn.adafruit.com/adafruit-lis3dh-triple-axis-accelerometer-breakout and https://circuitpython.readthedocs.io/projects/lis3dh to learn more about its capabilities, such as tap and double-tap detection. Some of them require additional wiring.
Libraries required: https://github.com/adafruit/Adafruit_CircuitPython_LIS3DH and https://github.com/adafruit/Adafruit_CircuitPython_BusDevice
>>> import board
>>> import adafruit_lis3dh
>>> a = adafruit_lis3dh.LIS3DH_I2C(board.I2C(), address=0x19)
>>> a.acceleration
acceleration(x=-0.0862066, y=0.019157, z=9.73177)
# in m/s^2

>>> import pew
>>> pew.init()
>>> screen = pew.Pix()
>>> while True:
...     x, y, z = a.acceleration
...     screen.box(0)
...     screen.pixel(4 + math.floor(0.3*x), 3 - math.floor(0.3*y), 3)
...     pew.show(screen)
...
Community
If you would like to talk with other users of the device, exchange ideas, seek help, share the games you made or simply just see what is happening in the project, you can subscribe to the mailing list.
There are also some users active at CircuitPython Discord channel, if you prefer a more interactive chat.
All the code and design files for the project can be found in the pewpew-game GitHub repository.